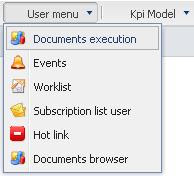
1) In SpagoBI web console, click "User menu" --> "Documents execution":
![](https://blogger.googleusercontent.com/img/b/R29vZ2xl/AVvXsEj1S3ctI-ck2a9P7JYDfEWK42NQbjxbvpzEY1xr_aEp-9R42JavBZ_8q3nmaxEYdRK-WnDp_RtTwLBt-EtNM7GK7RO8bt7XSk-XKSU1hs5lW5Z6A2iVlLz6NH77ssfAg1eESkePZQv_ywY/s400/ETL-11.jpg)
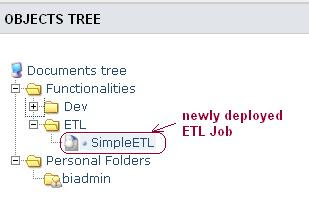
We found that the newly deployed ETL job is already there:
![](https://blogger.googleusercontent.com/img/b/R29vZ2xl/AVvXsEjdPxEgFy-LzLPpHiHtA4ksm_lDbAjZkY6EH_4XefzB0g8eZcl7RKTbbcwiKmeBesr3oKLpFi11BhY63uIdID-nAKVnxmi1Pj1lwuN9s81WA6vaw1mGFVBB1HD2Is06bCLtGSD73kGaImE/s400/ETL-13.jpg)
This is because the following settings in the file "engine-config.xml" at the folder "tomcat_home/webapps/SpagoBITalendEngine/WEB-INF/classes/":
<spagobi_autopublish>true</spagobi_autopublish>
<spagobi_functionality_label>ETL</spagobi_functionality_label>
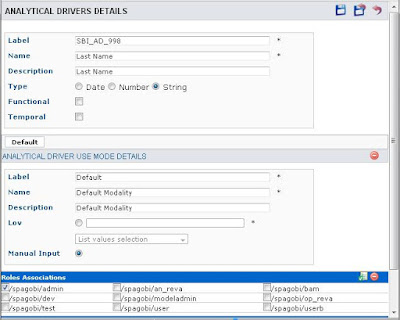
2) Create a "Analytical Driver" for the context variable (parameter) required by the ETL job
![](https://blogger.googleusercontent.com/img/b/R29vZ2xl/AVvXsEhMdnyrJENgvRdsg4bEnSRF_asLkmdOBJmPHhwpBSJVHffPhM4qoSPyZEo5WOXAUEXWd59BQ2WKAxADHI_BUjtS_vXOpcC4C0k_S5N60GsYKN0hwxATS7ClBPa8r1So6WaEhpXmTNWji2k/s400/ETL-14.jpg)
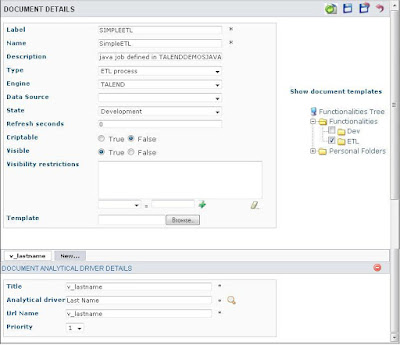
And edit the ETL job detail to associate the analytical driver with the context variable "v_lastname" (need to be exactly the same with that defined in ETL job):
![](https://blogger.googleusercontent.com/img/b/R29vZ2xl/AVvXsEjX2PLaUuwCh2CF06KNLZzuqAVpqTww9qTB_tQ17lY3ckwMlV8psRI9mdMVAvwe5wvzruZi_SbXX_VJTGlv3eDs5vJsJ-KmcRiVrmEfTUXiTEgRqVXMMds-pzVRtaNWB-aHLW1ajoyp2hs/s400/ETL-12.jpg)
3) Save the changes.
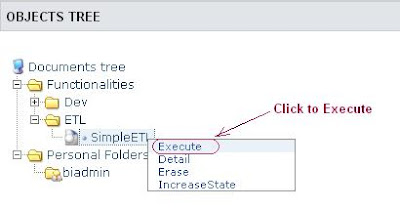
4. Execute the ETL Job within SpagoBI
Now, after the settings are done, we can execute the ETL job from within SpagoBI server
![](https://blogger.googleusercontent.com/img/b/R29vZ2xl/AVvXsEgLJUHegOWDJwx_esspibb_SRL8mvL-OXJug_c5NFdez0QebV7ygpaNk4zPxmC8Tv6J8-hxlAx-cUUdBovhfhuYs7eOOrZAX39DIrSxLKkN7KnQqqjSwNG_jLxjUxYWwnTtAJ1y38slvXs/s400/ETL-15.jpg)
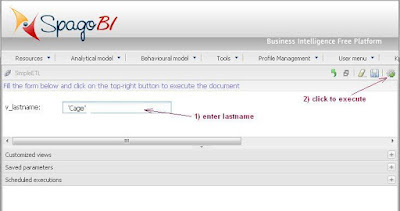
Fill the value for "v_lastname" and execute the job:
![](https://blogger.googleusercontent.com/img/b/R29vZ2xl/AVvXsEirQ59KakK7yr3PNDQjHOFRfzu6wYpmWix9kHHgYC-Y4brgVHVoU7cXnWfp8lYb13e8h74eDf92Rz-S6yVH9D6SjonjYTCrL34Z2czCZXg0yD1WEY69UuuNKrk_EG8oXpwXq3_YRbv036w/s400/ETL-16.jpg)
ETL process started:
![](https://blogger.googleusercontent.com/img/b/R29vZ2xl/AVvXsEh7X9ERs0yc32c_GLltJlpfpvPutPbaFHdhQt3ZyrysvUeZKHvo1wcP90CAM9NjbtIj2K8sg-E3-X5sLqlyfGV93-yAjVikRN4N0jqOD5KpPDhvSgpGEcl7t_AWQxrc5BbJo3XphAjjDv4/s400/ETL-17.jpg)
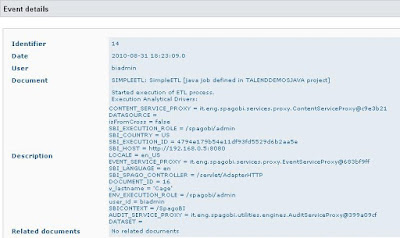
For more detail about the executed ETL job, we can check it's event ("User menus" --> "Events"):
![](https://blogger.googleusercontent.com/img/b/R29vZ2xl/AVvXsEhtw1HDWeYf2uuMnFre_jaUGQZ1ySnVSahy8lo3-2fj67h9LpeLOWFIi6bMVpJuxIKbigNr1zMGD4f4xLfxpWU_J02fOj-njwAbpv7d-uGfijW5NbWSwZOq7lVuZsxOJu6XIek4lNTKKps/s400/ETL-18.jpg)
Or, by checking the log file at: tomcat_home/logs/SpagoBITalendEngine.log
5. Schedule the ETL Job using SpagoBI Scheduler
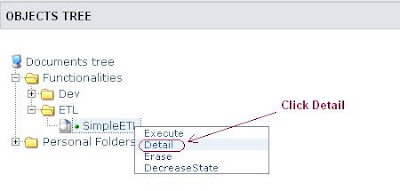
1) Click "User menus" --> "Documents execution" and modify ETL document detail
![](https://blogger.googleusercontent.com/img/b/R29vZ2xl/AVvXsEgqGrlmCO6hp4KuQvbokMsV862vOVKZYAhS7VQAHxXdCpuybjNxfC07baAvNQwZjeU5ZOogjfmBC-f0JQQnBx6bAFcG4kCtzYQjxZ9C-TVGroZC9yI4AmC6CPdW8x22qbK4yS8uI0bNDds/s400/ETL-19.jpg)
2) Change the document state to "Released"
![](https://blogger.googleusercontent.com/img/b/R29vZ2xl/AVvXsEiGNLbQQUvdZDAiln2tAgobC-l7Zi7TQdNBvEw1kvTQ5BbgNiA70a4Fppv2qGAmRLKdgwvgJzcPz-f_Jlb82MuRmdh5vM63eH1mBzJHcktg9CN4fizTZkPQFQpjWZCGuX47sjbxAm3lXSE/s400/ETL-12.jpg)
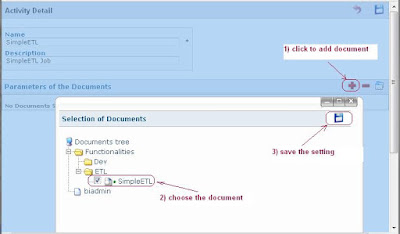
3) Click menu "Tools" --> "Scheduler", and click the button "New Activity" to add a new activity:
![](https://blogger.googleusercontent.com/img/b/R29vZ2xl/AVvXsEhXCJEBX43FdEbpS3URNxyDl87i3WofsrkzU3cfYy28XCbLLwwNyIeIuyQ7iv4_VGIU3juefjYsL0pe_kOzLCZtzcL6iO7SfctvjSUfHES0yWU1pmsge192Q97fBqcilpIoLpOUrtPQ6Q8/s400/ETL-20.jpg)
Also set the way of how to assign values to parameter, then save the activity.
4) Schedule the activity
![](https://blogger.googleusercontent.com/img/b/R29vZ2xl/AVvXsEhD7XuYD2X8sGwsF_Oc-xWNZCUhMhAU5VAsK8NEzpAvZmRm6srPVG21UGORHFurDmulU5HtHv8k9VMhMQbGqT68fSZLD8FH5fZPX564_-mrMEYAbu8tF9wywECpDWw5i76ogrmr0SXYfhc/s400/ETL-22.jpg)
And create a new schedule for this ETL activity, save the settings, and exit.
So far, the ETL job is scheduled to run.
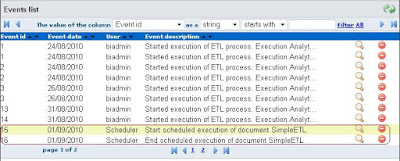
5) Check the execution of scheduled job.
Click "User menu" --> "Events" to see events lists, also can check the details of start or end execution of scheduled job.
![](https://blogger.googleusercontent.com/img/b/R29vZ2xl/AVvXsEjR-pP28RMdA2kzXBH6HhyphenhyphenO0zSkUlNzfRZRMFci-X7F4gMWeZwb4xBqcw_AnP-VOpoAnCimRoadLbf2mwfWHLCRA7LFSIPEJOhS6qlGzzd8aOZcUeh1as5bujO13oPwsUJ5dhRTFX6O9_o/s400/ETL-23.jpg)
(complete)